
Map Tools and Location Systems
Maps in Craft are different
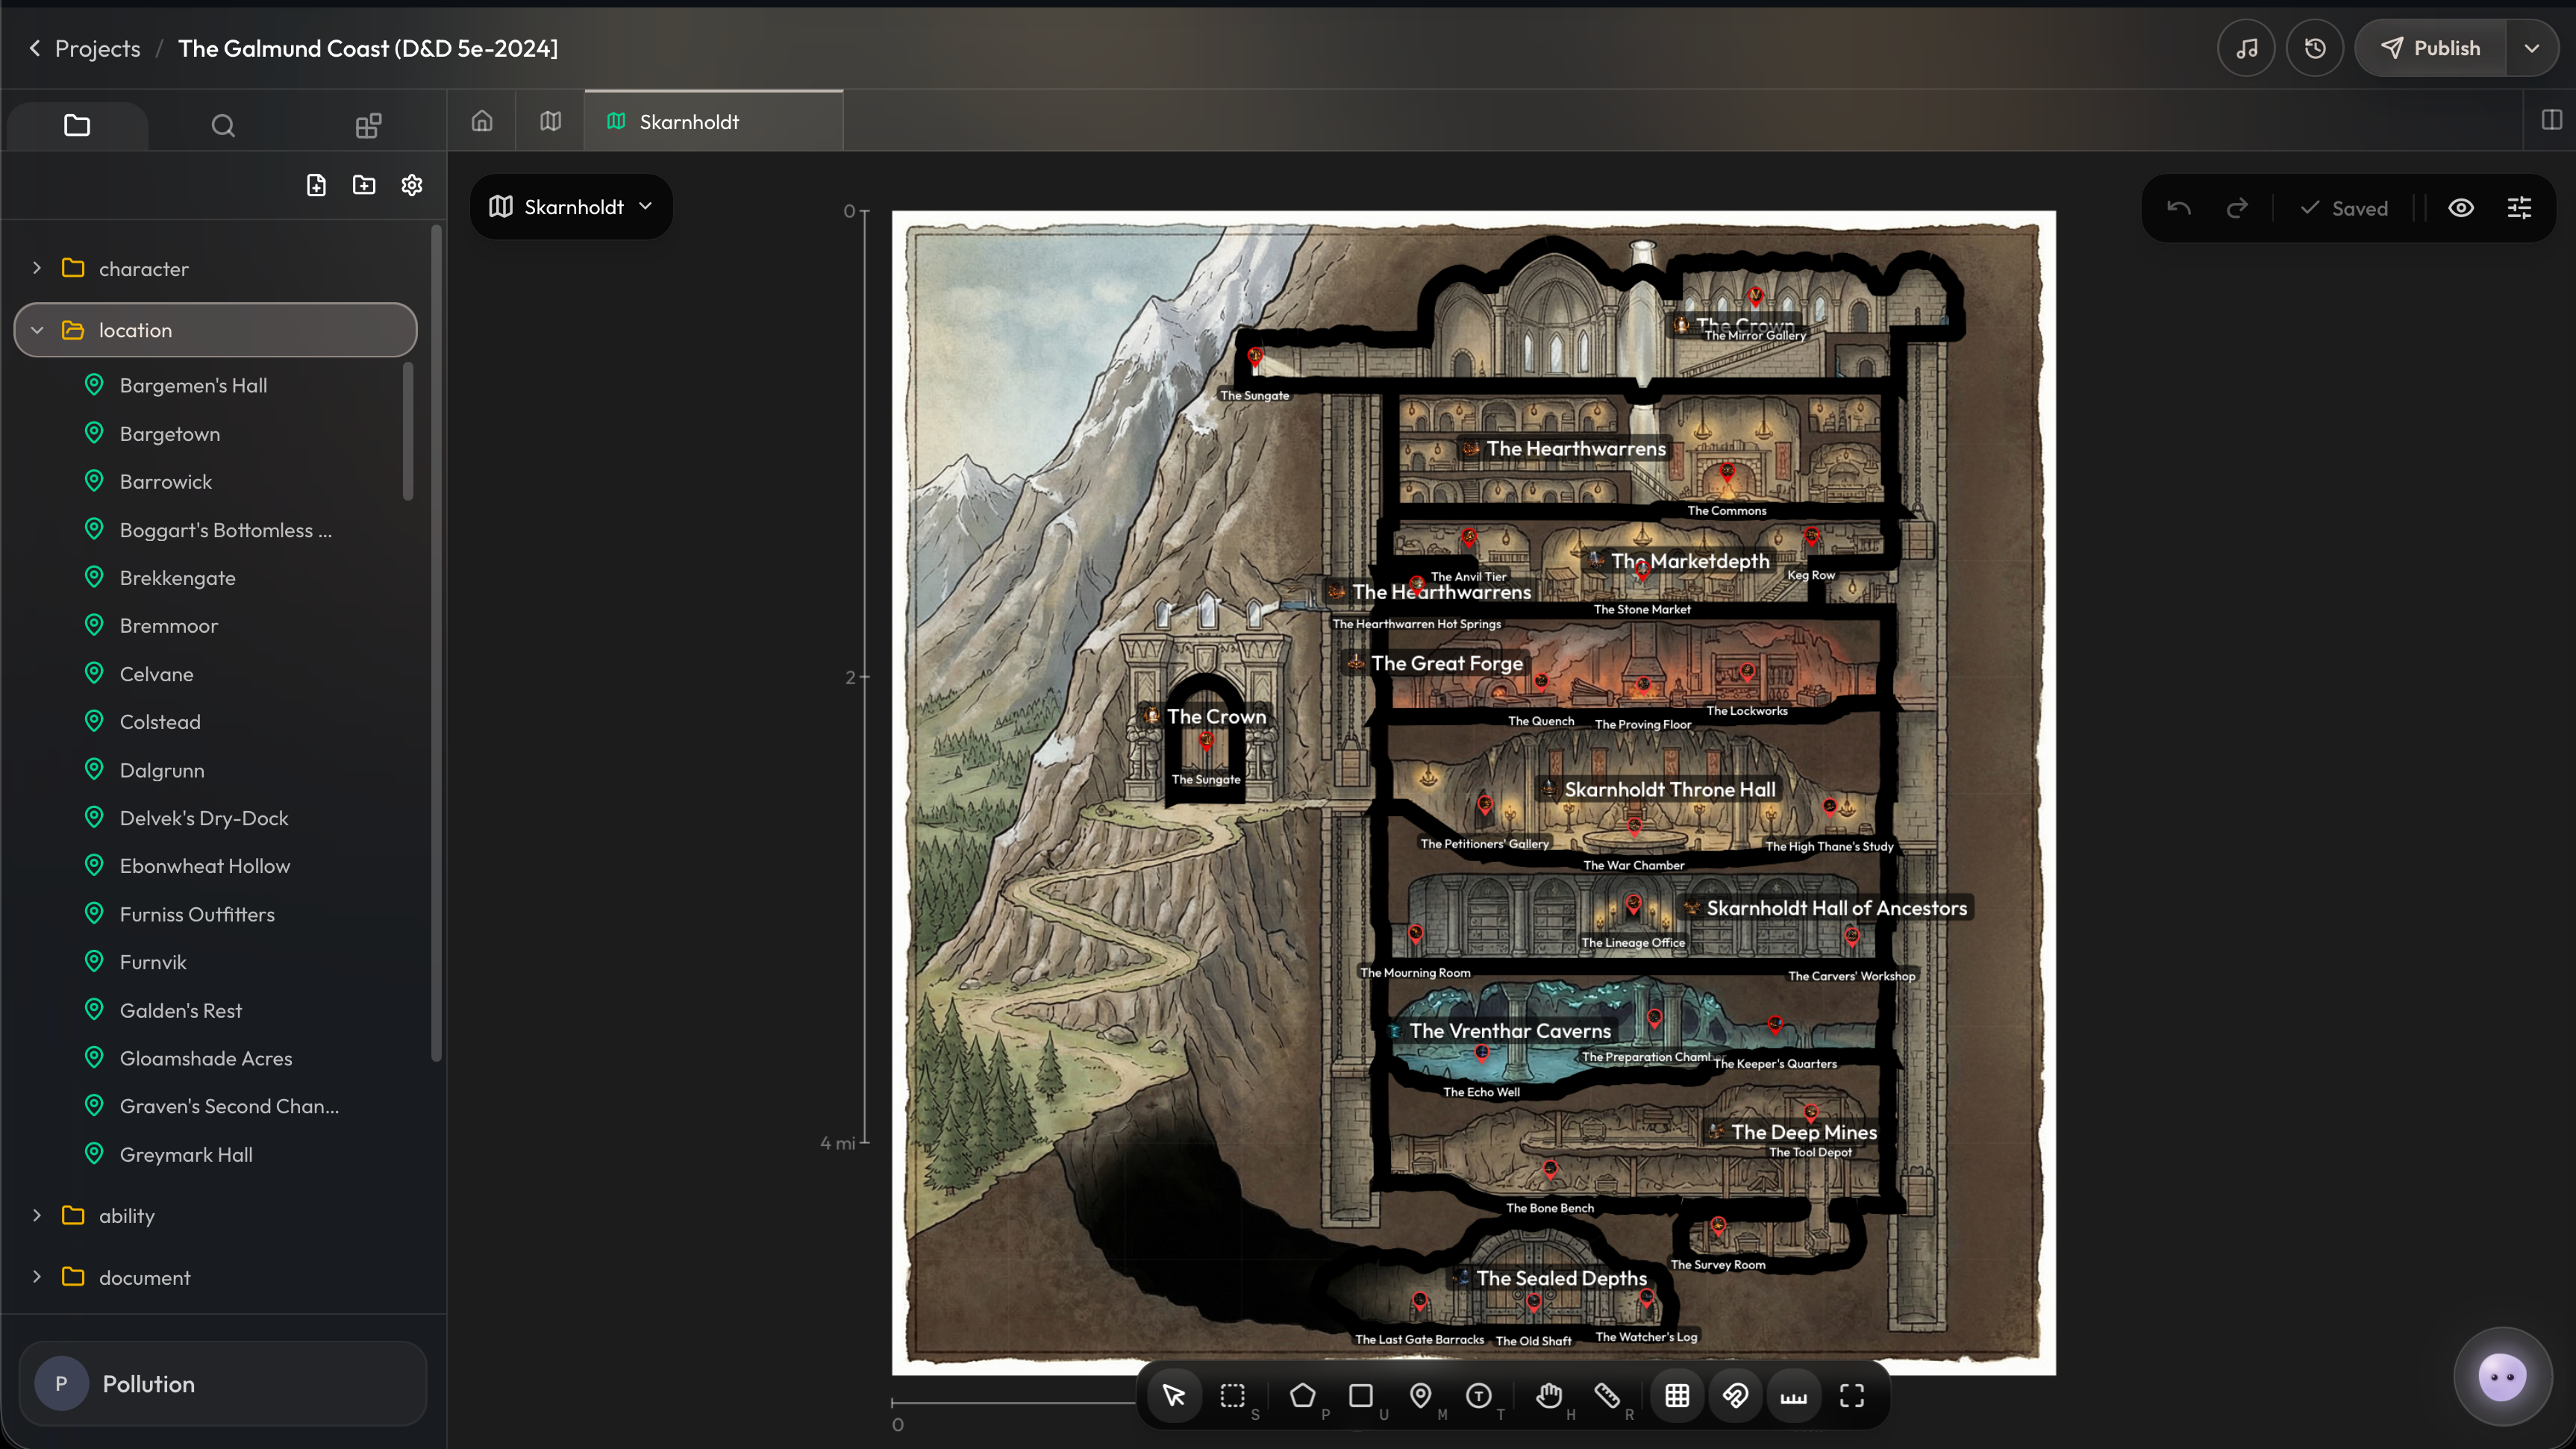
If you came over from Friends & Fables, the map system in Craft will feel unfamiliar at first. F&F maps are infinite-zoom, like Google Maps (one big canvas where you keep zooming in). Craft maps are hierarchical. You build a world map, and inside that world map, individual places drill down into their own dedicated sub-maps. A continent contains a kingdom. The kingdom contains a city. The city contains a tavern. Each level is its own map image with its own scale, and you move between them by clicking through. You can nest as deeply as you want (the system doesn’t care if you stop at a continent or keep going down to the floor plan of a single room).
The other big shift: in Craft, locations are files first, and shapes on the map are links back to those files. You don’t draw a region and then write notes about it. Instead, you write a location file, and then you draw a shape on the map and link it. This guide walks through how that works, and how to use the toolbar to build it.
Locations and map shapes
A location is a file in your project found usually under a Locations folder. The file holds the location’s name, description, cover image, and any other fields you’ve added to the location file type.
A map shape is a polygon, rectangle, or pin you draw on a map. Each shape can be linked to a location file. Once linked, clicking the shape pulls up that location’s information, and the shape becomes the on-map representation of that place.
You don’t have to link every shape. You can drop polygons and pins purely as annotations ("this whole region is wilderness" or "X marks the spot"). Linked shapes are the workhorse, though, and most of what you draw will end up tied to a location file.
Drawing region shapes: polygons, rectangles, circles, and hexes
Use shapes when you want to claim an area of the map (a kingdom, a province, a forest, a district, etc). There are four tools for this and they pick up the same shortcut idea.
Polygon (P)
-
Click around the edge of the area you want to outline, vertex by vertex. Close the shape by clicking your starting point or pressing Enter.
-
Vertices snap to nearby shapes automatically, so neighboring regions can share clean borders without overlap.
-
If you misplace a vertex while drawing, retrace back over your existing points to remove them (useful for trimming the tail of a sloppy polyline without restarting).
-
The vertex simplifier is intentionally light-handed, so a freehand outline keeps the shape you actually drew.
Rectangle (U)
-
Click and drag to draw a rectangle. Use this for grid-aligned things (city blocks, room outlines, anything with four sides).
-
Rectangles are also the fastest way to claim large rectangular sections of an unbuilt world map while you’re still sketching out borders.
Circle (C)
-
Click where you want the center, then drag outward to set the radius. Perfect for zones of influence, blast radii, and anything round that would be a pain to trace with the polygon tool.
Hexagon (X)
-
Click for the center and drag outward to size the hex. Hold Alt/Option while dragging to rotate it.
-
If your map uses a hex grid, hovering highlights the grid tile under the cursor and a plain click fills exactly that tile — no freehanding needed to claim individual hexes. Hold Shift while clicking to stay in the tool and place several tiles in a row. Dragging still draws a freely sized hex.
-
New hexes match the grid’s orientation (pointy-top or flat-top) automatically.
In the toolbar, all four shape tools share a single button — click the small arrow beside it to switch which shape it draws (Polygon by default). The keyboard shortcuts always work regardless of which shape the button is showing.
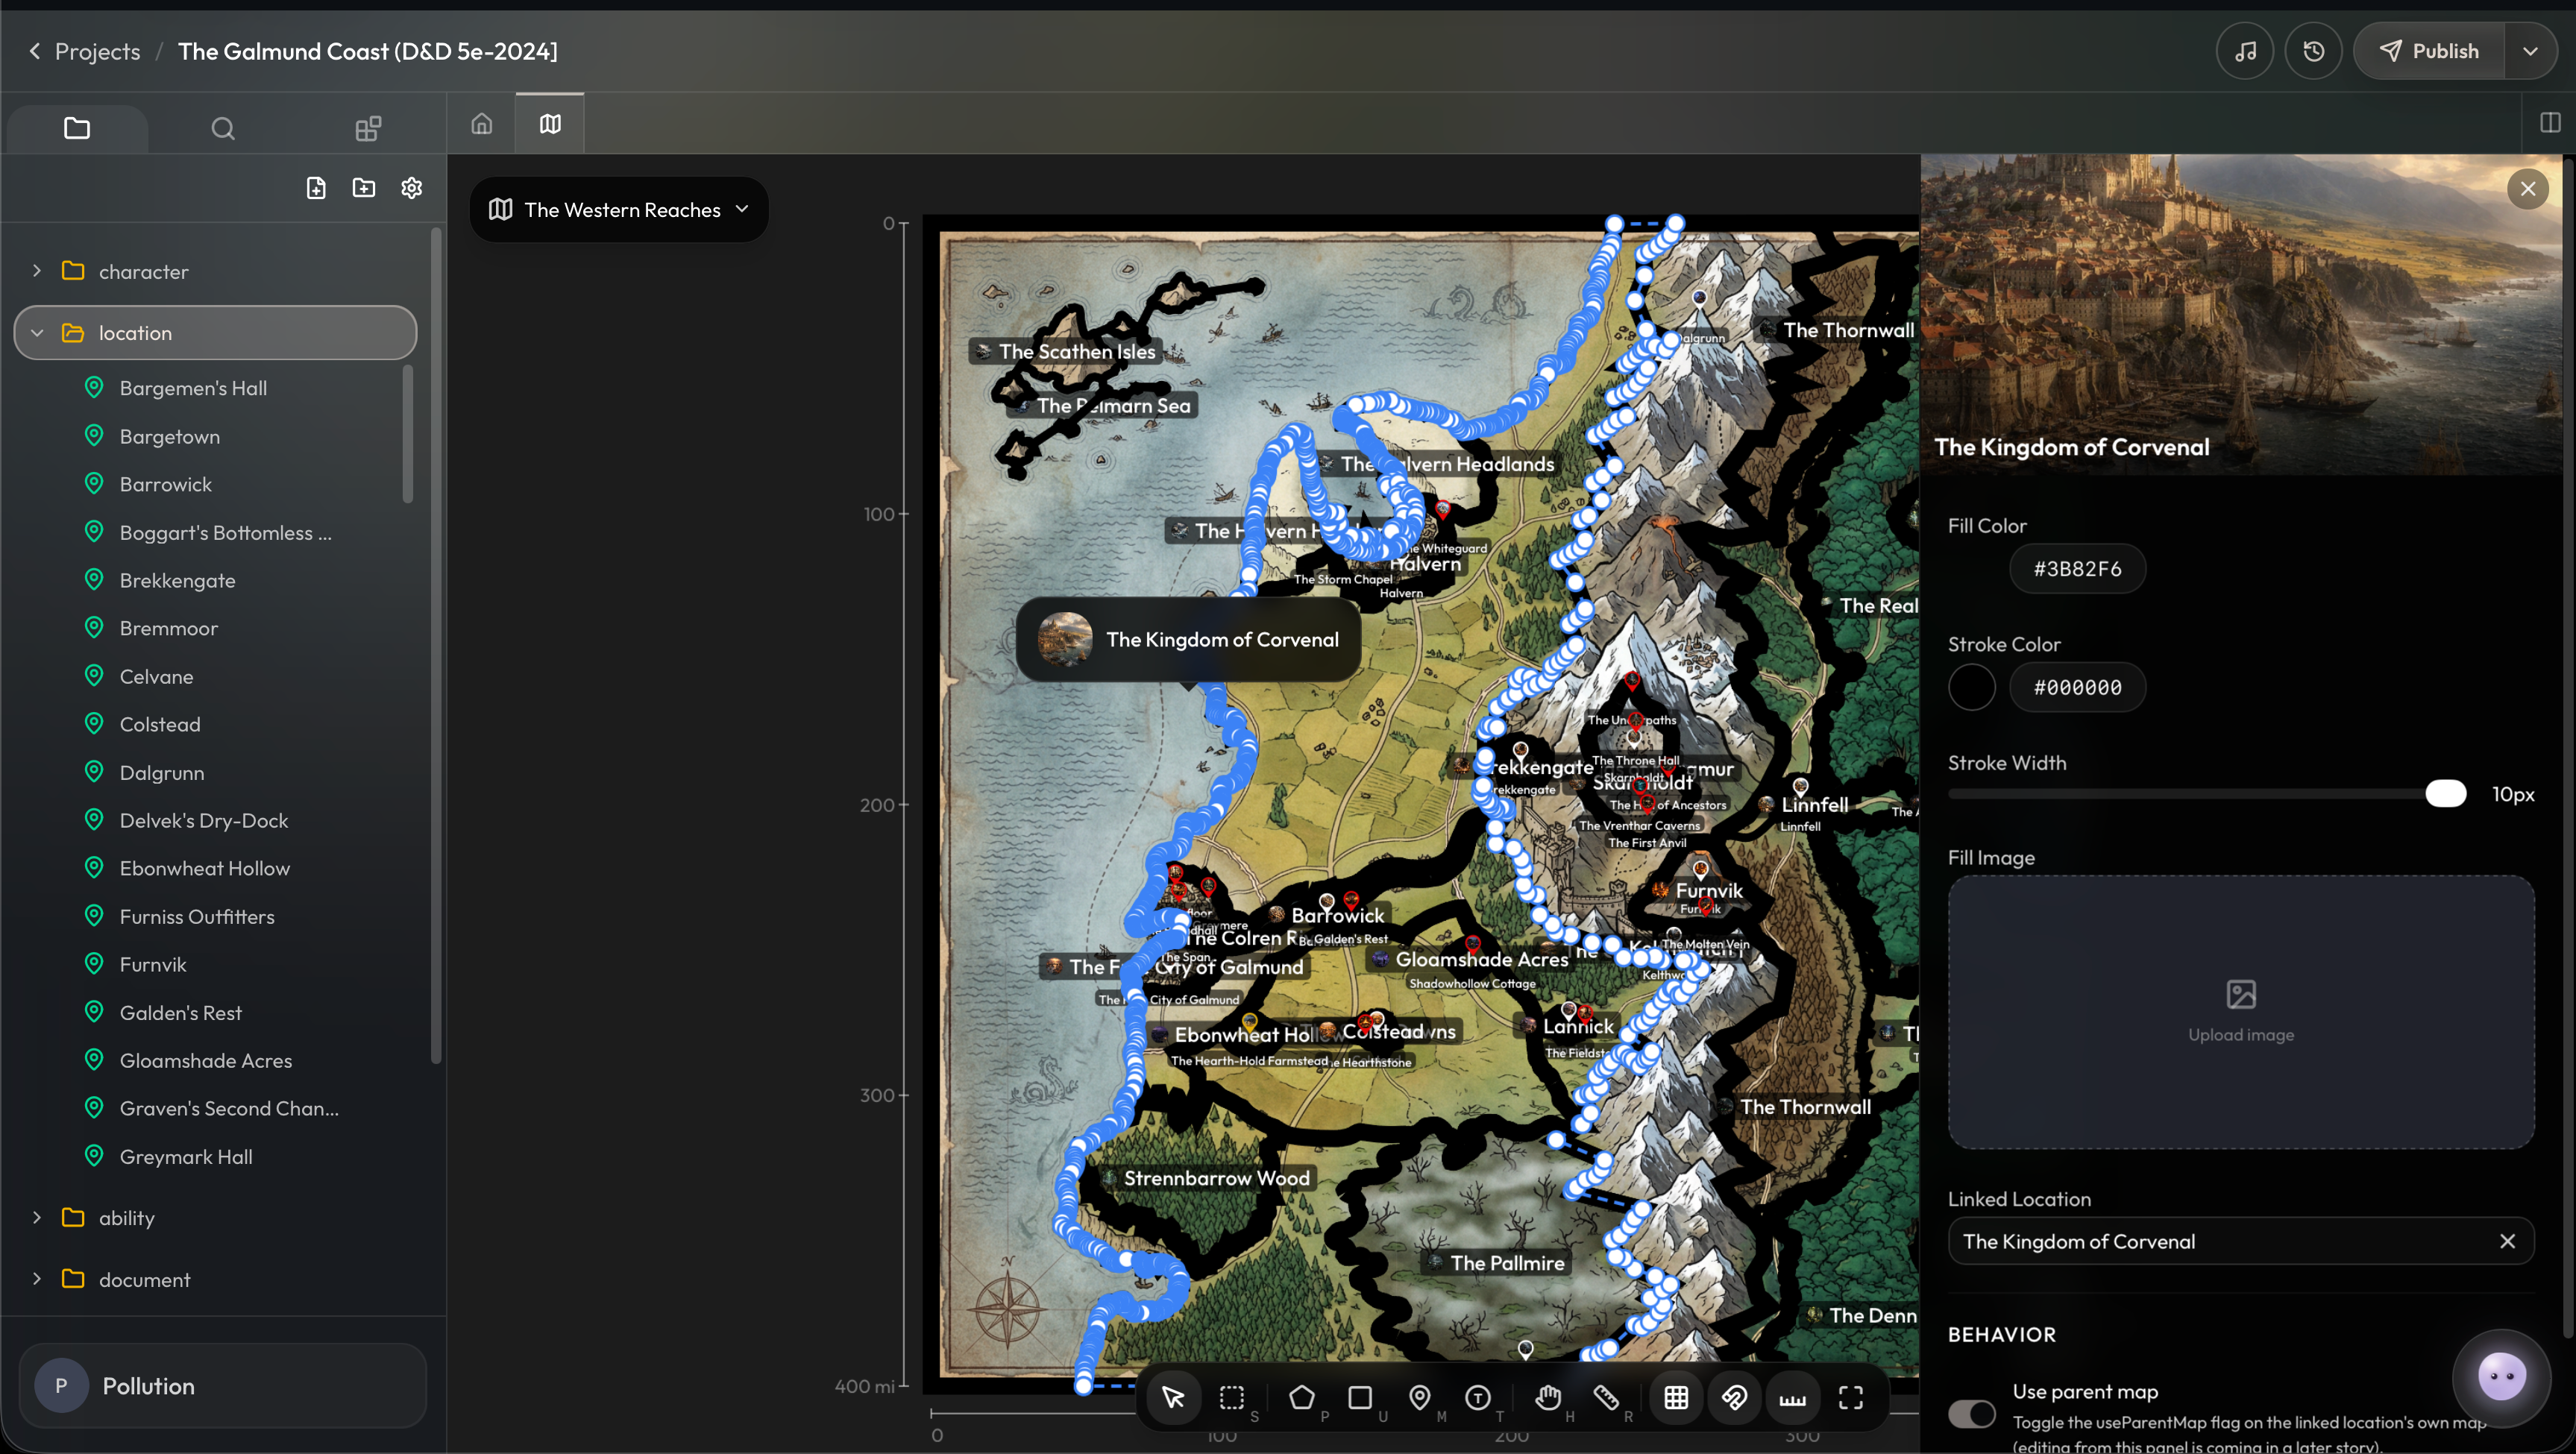
Once a shape is on the map, click it with the Select (V) tool to open its inspector on the right. From there you can pick a Fill Color, Stroke Color, Stroke Width, optionally upload a Fill Image to texture the region, and link the shape to a location.
Map pins for places
Pins are point markers (single dots dropped on the map for places that are too small to outline as a region). Cities, landmarks, ruins, taverns, anything you’d mark with a pin in real life.
-
Press M or click Map Pin in the toolbar, then click anywhere on the canvas to drop a pin.
-
Pins use a single Color instead of fill and stroke.
-
Pins have a Position shown in normalized coordinates (e.g. 20.5%, 64.5%). The map is laid out on a 0–1 grid no matter the image dimensions, so position is always relative.
-
Like polygons, pins have a Linked Location field. Linking the pin to a location is what makes it clickable to a player and gives it a name on the map.
Tokens for characters and entities
Tokens look like pins but they’re for characters and entities, not places. Use a token to mark where an NPC is standing, where a monster spawned, where a party member is right now, or anything else that represents a creature on the map rather than a location.
-
Press T or click Token in the toolbar, then click on the canvas to drop a token.
-
Craft prompts you to link a character or entity file right when you place the token. You can link it now, link it later, or skip the link entirely.
-
Tokens have a Label you can set independently of the linked file (handy for "Goblin #3" or generic NPC tags when you don’t want to make a separate file).
-
Default token color is purple so they’re visually distinct from the white pins.
Drilling into nested maps
Any pin or polygon that’s linked to a location can have its own sub-map. This is how you build a hierarchy.
-
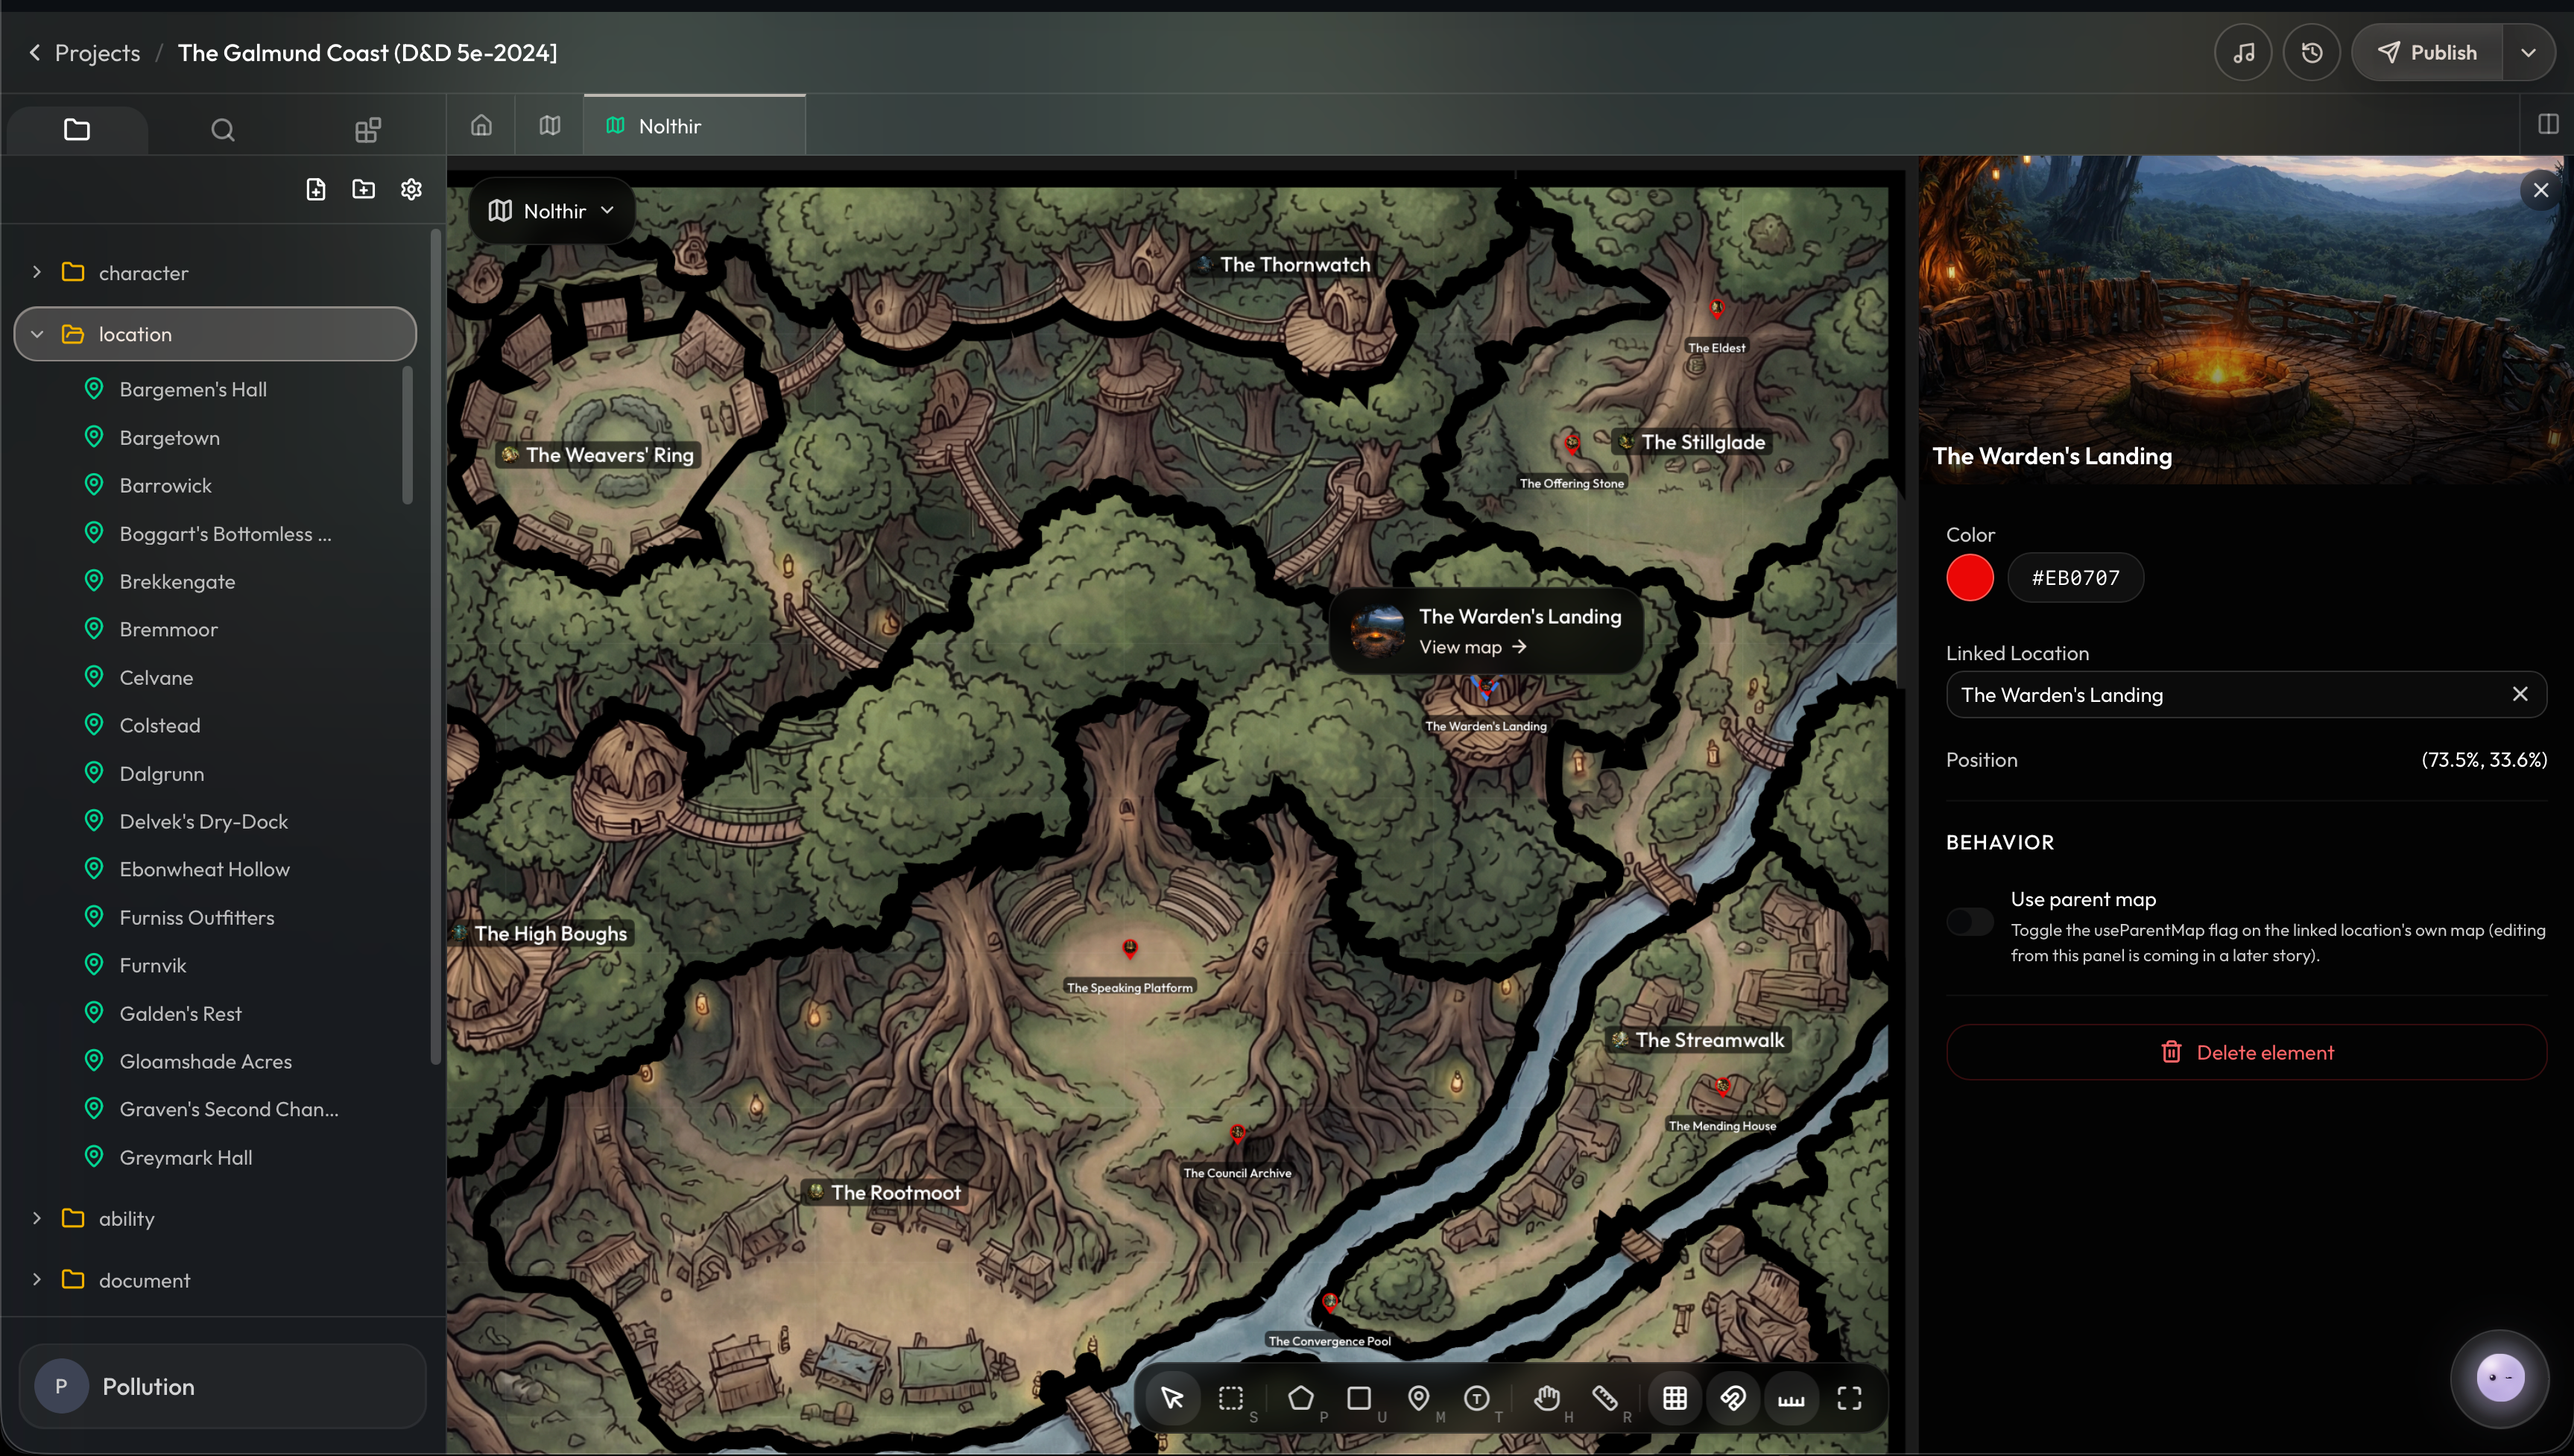
Click a linked shape on the map. The inspector’s preview card shows the location and a View map → link if that location has its own map set up.
-
Click View map → to drill into the sub-map. The breadcrumb at the top of the canvas tracks where you are (click it to jump back up the hierarchy). Imagine going from a world map into a city map, and then from the city map into a guild hall map, and then from the guild hall map down a hatch into a hidden tunnel system map. This is how nested maps work.
-
In each shape’s inspector, the Use parent map toggle controls whether the linked location reuses the current map or gets its own dedicated sub-map. Leave it off to give a location its own canvas; turn it on for places that don’t need their own map view (a tiny outpost in the middle of a wilderness, for example).

Locking elements in place
Once a region, pin, token, or overlay is where you want it, right-click it on the map and choose Lock element. Locked elements stay put on the canvas, so you won't accidentally drag them while editing nearby shapes. You can still select them and change their properties in the inspector — unlock them the same way (right-click and choose Unlock element, or use the lock toggle in the inspector).
Map Toolbar Overview
The bar across the bottom of the canvas is the same on every map, no matter how deeply you’ve nested. From left to right:
-
Select (V) – Click any shape, pin, or token to open its inspector.
-
Multi-select (S) – Drag a box around several elements to move or resize them together.
-
Shapes – One button for the draw shapes. Click the arrow next to it to switch between Polygon (P), Rectangle (U), Circle (C), and Hexagon (X); the button remembers your last pick.
-
Map Pin (M) – Drop a point marker linked to a location.
-
Token (T) – Drop a marker linked to a character or entity.
-
Pan (H / Space) – Hold Space and drag to move the canvas. Same as the hand tool.
-
Ruler (R) – Measure distances on the map in your map’s configured scale units.
-
Hide grid – Toggle the on-canvas grid overlay.
-
Disable snap to edges – Turn off the auto-snapping behavior when you want freeform vertex placement.
-
Hide scale – Toggle the scale ruler at the edges of the canvas.
-
Fit to viewport – Zoom the canvas so the whole map fits the screen.
The top right of the canvas has Undo, Redo, a Save indicator, Switch to view mode (preview the map as a player would see it), and Map settings. This opens the properties panel for the map itself (aspect ratio, scale and units, background image, and a list of every pin on the map).

Creative ways to use maps
Once you understand the hierarchy, the map system gets more flexible than it looks. Some patterns worth borrowing:
-
Stop wherever you want. You don’t need a full continent → kingdom → city → building chain. A one-shot can live entirely on a single tavern map. A galaxy-spanning campaign can stop at the planet level. Build only the levels you’ll actually use.
-
Mix scales freely. One sub-map can be 100 miles wide and another can be 10 feet wide. The 0–1 coordinate system means the GM can reason about positions on either map without conversions.
-
Move locations between maps. A spaceship is a location with its own internal map. Move the ship’s pin from one star system to another and the whole interior travels with it.
-
Use unlinked annotations. Drop a polygon over an entire mountain range without making a Location file for it (useful for terrain, weather zones, or factional control overlays you don’t want cluttering your file tree).
-
Use Fill Image to overlay textures. Set the fill image on a polygon to a forest pattern, a sand dune, or a faction banner (the region renders with the texture instead of a flat color).
-
Use the boundary tool in map settings to limit how far a player can pan, useful for keeping focus on the area that matters and hiding undeveloped corners of the map image.